Showing posts with label Sewing Projects. Show all posts

Monday, March 12, 2012

Cards and Clips

I haven't posted any of the recent projects I've worked on because I just seem to have to many going on at once!

Recently, I received two birth announcements from friends having little boys. I'd also seen a very cute quilt card idea that I wanted to try, so I thought now would be the perfect time to give it a try!


Here's a close up. I just used a marker to make faux stitches and then clipped a button and tag to the bow.


I turned this sample in for the place cards for our church ladies banquet. It got a unanimous thumbs up from the committee! Last year I made 86...wonder how many I'll have to make this year? Our theme for this years event is hats! This is one of the biggest events that our church hosts each year. Every year improves a little more and gains more interest. It's been a blessing to watch it grow and I can't wait to see how everything comes together this year!


Cassie and Colin went to a friends birthday party this weekend and had a wonderful time. The birthday girl, Evelyn, likes accessories so I decided to make her some yo-yo hair clips.


I have several jars of assorted buttons, but you might be surprised to find out that all but the grapes are scrap booking/card making brads...not buttons! If you look closely, you'll see where I attached the brad. The clip blanks have a hole in either end that you can attach the yo-yo to. You can make them in assorted sizes for endless possibilities!

Friday, February 3, 2012

Danny's T-shirt Quilt...Finally!

Last summer I put a memory quilt together for Cameron. Well, we had a little problem...dad wanted one too! Danny began to think I was never going to get around to finishing his because a different project would jump to the head of the line. My poor hubby has watched me pull this project out and put it away a couple dozen times over the last 6 years. He'd had enough...he took Cameron's quilt ransom and refused to give it up until his was finished. He would snuggle in it and say to Cam...tell mom to finish mine so you can have yours.
We've just been so busy...I thought I could finish it for our anniversary, but that came and went. Then Danny asked, can I have it for Christmas? That came and went too! How about my birthday? Still couldn't get it finished! Danny left for California almost 5 weeks ago for training at the Chief's Academy...well, I've had to keep myself busy and guess what was first on my priority list? How about for graduation, dear?

Once I got the shirts from his childhood, high school years, years in the service, t-ball and soccer coaching, scouts, ski trips, family reunion, and a couple special pieces of the kids clothes all put together for the top, my neighbor and friend offered to let me use her long arm Gammill to quilt it! WOW...can I just say that is an intimidating machine! It only took me a moment to remember how how frustrating it was to quilt Cam's on my little machine...intimidating was worth it!


I have to share this, it took me a week to quilt Cam's and 7 hours to quilt Danny's! Most of that time was me getting comfortable with the new equipment! Danny's quilt is about 18 in. longer and wider than Cam's...there's no way I would have been able to finish it on my machine!


I'm glad it's finished and I can't wait to give it to him! No more t-shirt quilts for a while. Although, Colin did ask me, "Ma, when I get Cam's age will you make me a quilt with my shirts!" How can you not say yes to such a sweet request?! Thankfully I have some time!

I've linked this post to Homestead Revival's Barn Hop and Teaching Good Thing :Fiber Arts Monday

Wednesday, February 1, 2012

Coverall Dresses

About two weeks ago I stumbled upon the cutest coverall dress. In the link you will see how to make this darling little dress made from an old pair of coverall's. I love coverall's and remembered that I put two pair that Cassie had outgrown in length in the attic. You guessed it, I ventured into the attic for those coverall's! It really was easy...pick out some fabric, cut off the legs and attach the skirt! VIOLA...the overalls are back in business!


Friday, January 13, 2012

Finished Block


Here is my finished 12x12 quilt block for January. It was interesting working with the smaller pieces...something I'm not used to. I can't wait to see what next months block will look like!

Thursday, January 12, 2012

Block of the Month Club

Does your local quilt shop have a block of the month club? Ours does and for $5 you can have a quilt top in December! It's been 10 years since I participated in a block of the month club. It's an easy way to feed that need to sew and not get overwhelmed with picking out fabric and finding the time to actually do the project! For example, right now I am working on a T-shirt quilt for my hubby that has been moved to the back burner 100+ times over the last 6 years! I'm determined to complete it so I can give it to him when he returns home from the Chief's Academy!


Because it's only $5, there are rules. You must complete your block by the second Saturday of the following month to take in and show to receive the new pattern and material at no charge. If you can't make it, our quilt shop is generous enough to give you 1 free pass but any missed after that will require another $5 fee. It's almost like you have to earn your next pattern! A quilt for $5 is well worth completing 1 block to turn in each month!

Tuesday, July 19, 2011

Lady Bug Tote


When I am feeling stressed, I usually retreat to my crafting station for some therapy. As I was going through my project dresser (I use an old dresser to house my fabric and unfinished projects), I came across these squares that I had planned to turn into a crib quilt. I really wanted to do a quick little project, so I thought a tote wouldn't pull me away from all the other things I had going on for too long! When I was finished, I took it over to my dear neighbor and friend who loves lady bugs. She loved her new tote!
Back to canning I go...tomatoes and peaches today!

Monday, June 20, 2011

Memory Quilt

I finally finished Cameron's memory quilt! He's only been asking me to make him one for the last 5 years! I'm glad I waited, because he's participated in some pretty neat events and the t-shirts he got were the perfect touch to his quilt. Since he's not too interested in blogging I think it's safe for me to post it for you guys to see!


Every square on the quilt is made from a t-shirt either from an event he participated in or a team he played on. I did have to use some fabric as a filler to make the squares line up. I found some boyscout printed fabric at Keepsake Quilting in New Hampshire a few years ago and saved it for this very project! I'm waiting to give it to him at his Eagle Scout Court of Honor (which is July 30) since most of the shirts are scout related. For the back, Cameron requested flannel so it would be nice and cozy. I had him pick out a few different patterns and he chose hunting and fishing and a red and black print that looked like his PJ pants. Overall, I'm thrilled with how it turned out and it wasn't as hard as I thought it would be...that's really why I put it off for so long. Guess what I'm doing now...one for Danny...my goal is to have it done by our 10 year anniversary in August! Wish me luck!


I've linked this post to Barn Hop #17 at Homestead Revival. Hop on over and find some fantastic ideas!

Wednesday, March 30, 2011

Old Jeans, New Skirt(s)!

I came across these over at the Barn Hop...lots of neat ideas there, but you can check this fabulous idea out along with its how to's HERE! I went COO-COO for these adorable recycled jean skirts! Let me just give you a brief history about Cassie and jeans...well, lets just say that Cassie and jeans have issues...big issues! She has the length of a 5T, but the waist of on average a 2T! Some of her shorts are actually pants she wore when she was 18-24 months old! Her waist is that tiny! SO...with this new, awesome, and VERY thrifty idea, I decided to venture into the attic where we keep EVERYTHING...need to remedy that soon (or NOT)...pulled out some pants that I knew fit her waist but no longer fit in length and I started cutting!

Here's skirt #1! My fabric is dwindling away! I almost made this fat quarter into napkins...I'm SO glad I didn't!


Here's skirt #2! The tag on these says 24 months and she still needs a belt! I have bean pole babies!


This one was her favorite...can you tell?! I'm working on a coverall one now...I'll show that when it's all done!

Tuesday, March 15, 2011

Chair Socks!

Back in November, my hubby and his best bud put wood floors down in the kitchen! To preserve our new floors, Danny put felt pads on the bottom of everything! We've been adjusting the felt pads on the chairs ever since! It was getting bothersome and expensive...those felt pads add up when your constantly replacing them! I thought I'd search online for something other than felt pads. I found the tennis balls...I don't really care for the look. So I kept searching...then I found some adorable little chair socks! They were perfect...accept they cost $10 before shipping and tax for a set of 4! Four socks times 8 chairs times $10 before shipping and tax...not looking so perfect after all! That is until I had a light bulb moment...don't you love those?!
Remember when I was talking about all that fabric I had when I was making napkins...I made like 30 napkins and didn't even make a dent in my fabric! Well, I thought I'd make my own chair socks...the chair sock idea was looking perfect again!

Here's what you need:
-a 6 inch circle pattern (I just used a piece of paper and a protractor)
-64 fabric circles (for 8 chairs)
-32 tight weave batting circles
-Raffia, twine, or ribbon


Step 1: Trace 64 circles onto your fabric (I doubled my fabric over and pinned it so I'd only have to cut 32) and 32 circles onto your batting.


Step 2: Layer 2 pieces of fabric with a piece of batting in the middle and pin.


Step 3: Sew a 1/2 inch seam on your circles leaving raw edges.


Step 4: Next you are going to rag your edges by sniping the edges all the way around each circle! It's time consuming, but the end result it too cute!


Step 5: Place the circle on the leg of your chair, wrap the raffia around to cinch it together, and then fluff the edges! This is the unwashed look.


This is the look after they are washed and dryed, which is the true "rag" look!

Note: I left the felt pads on each leg to give it a little more padding.

Thursday, February 24, 2011

Napkins!


In my quest to simplify, I came across this great idea! Napkins! Wait, before you say how is creating more laundry simplifying? Well, it's simplifying our family budget and I really like that we won't be creating as much trash, which in a round about way is simplifying in many ways! I have to say my favorite part of this project is using all those lovely fabrics I've been hanging on to just waiting for the perfect project to come along! Click here if you'd like to see a step by step tutorial on fabric napkins.

Monday, September 13, 2010

Kids Apron's


A few weeks ago, the kids, some friends and I went to the Museum of the Albemarle. For a free outing, I'd say it's a 10! They have a great kids area where they can play dress up, create a decoy, play puppets, and much more. While they were playing dress up, Cassie tried on an apron which gave me the idea to make the kids their own apron's...hopefully, this will help save on stain treating some of their shirts. If not, at least they'll look cute!

Sunday, August 22, 2010

Another Baby Rag Quilt


We have a couple of new babies at church and a couple on the way. I pressed a bunch of fabric and batting squares with my Big Shot. After I sandwiched the pieces together, I stitched an X on all the squares...this holds the layers together. Once they were all X'ed, I randomly placed them to be put together. Once the quilt is together, I stitched around the outside edge to close the sides. Finally, I snipped all the edges, then washed and dried it to give it the rag look.

Tuesday, August 3, 2010

My Favorite Handbag


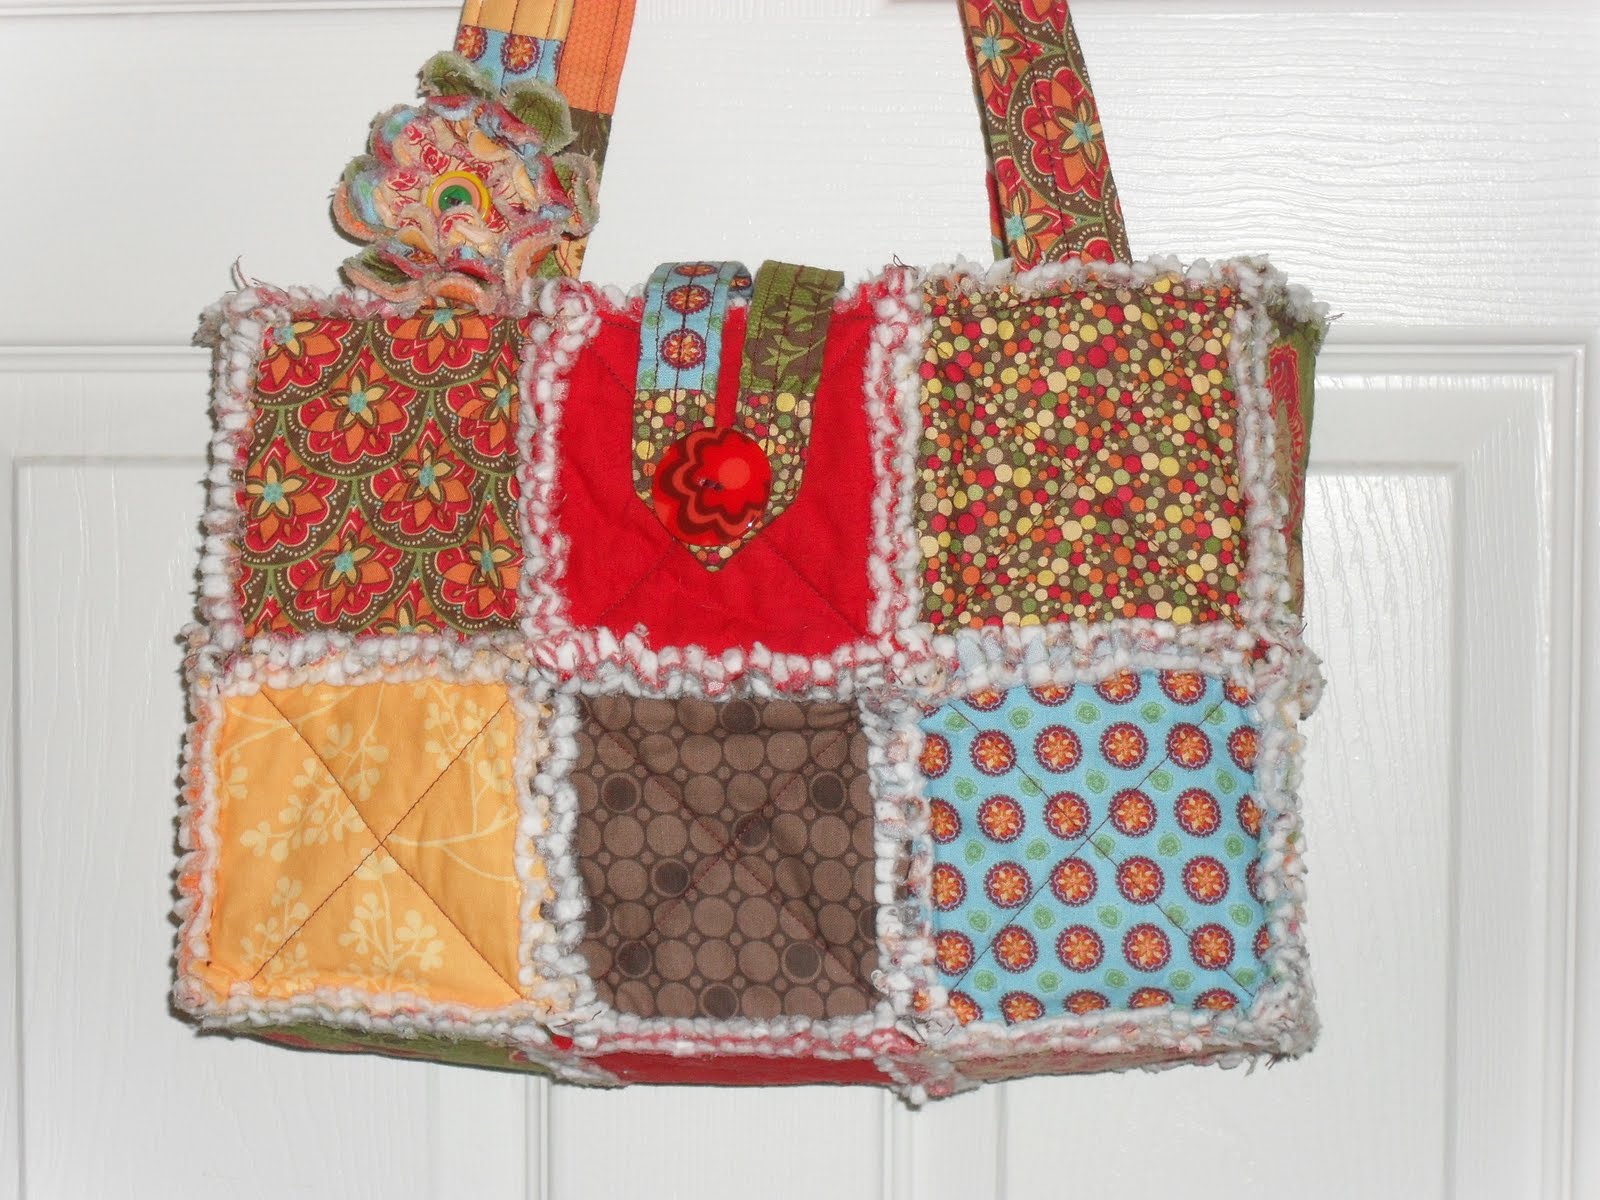
In addition to my purse, I tote this bag everywhere too! I carry my bible, magazines, school books, scout stuff...it all depends on the day and where I need to go! I have to admit, I cheated a little. Instead of using my Big Shot to cut the squares, they were pre-cut when I got them! I can honestly say, this is the only project I've bought pre-cut fabric for and I only did it because I loved the fabric! Take a close look at the handles. Because the squares were pre-cut, I had to sew several together to make a long enough handle! I cut my batting the same size as my squares so when I snipped all the edges, it made for a fuller look and showed off the raggedy edges. This technique also makes the bag less floppy. Hope you like it as much as I do! Oh, I didn't cheat on my flower...it was made with the Big Shot extra-large flower folds die!

Thursday, July 15, 2010

Baby Rag Quilt


Here is a baby quilt I made just before I started my blog. All of the squares were made with the Scallop Square Clear Bigz Die. I even cut my batting with it. Cutting the batting the same size as the squares makes the quilt less floppy and it gives the rag edges a fuller look. If you look closely, I stitched an X on all of my squares, that is what holds the layers together. Then I randomly placed all of the squares and put them all together. Before I snipped all of the rag edges, I stitched the border of the quilt to close the edges.

Monday, May 10, 2010

Happy 50th Deb!


My mom gave me a special project this weekend. Our Dear friend Debbie, who lives in beautiful San Diego, is turning 50 and her family is throwing her a black and white party. Since my mom will be out there for work, she asked me to make her something special to go with the black and white theme! Can't wait to her about all the highlights of Debbie's fabulous day!

Wednesday, April 14, 2010

Another "Savanna Bag"


I'm on a roll today! Here is another version of the Savanna Bag.

Angie Juda's "Savanna Bag"


I know it's not stampin', but I did use my big shot to cut these squares! I took a long break from sewing when I was introduced to stampin'. Now that I can cross my two favorite hobbies, I can never decide which one I want to do! Today, I wanted to do some sewing and this is the 4th "Savanna Bag" I've made. For further details on how to make this cute little bag check out Angie Juda's blog at http://www.chicknscratch.com/search/label/Bags

Saturday, April 10, 2010

Hand Bags!


I have been going bonkers making these little hand bags! This one is for Cassie's little friend at church. I made a few to give away as prizes for our church Easter Egg hunt last weekend. As it turns out, I didn't make enough and ended up with a couple of orders!