Non-stick Stainless Steel? Who knew? Last summer I was shocked while making yogurt because there were little black flakes of Teflon floating in the milk! YUCK! I only noticed it because I was heating milk. I thought to myself how long have we been eating this stuff...I'm just glad I started making yogurt!
Anyway, switching all of my pots and pans to Stainless Steel took relearning how to cook. Using non-stick pans meant I could cook everything on high real quick! Not really, but I did have to adjust the way I cook!
Yesterday, I came across this video and my jaw fell to the floor! No more eggs in the pan...WOW! You know I'm doing this! Halle Cottis is a genius!

Thank you for joining me in my homemaking adventure! Drop in anytime and feel free to ask questions and leave comments!
Showing posts with label Home Helps. Show all posts
Showing posts with label Home Helps. Show all posts
Friday, April 6, 2012


Friday, March 23, 2012
Easy Carrot Cleaning!
It's spring garden time! Which means I'd better get what's left of my winter garden out of the ground to make room! All I had left was carrots...a lot of carrots! So many carrots, I dreaded the thought of scrubbing them all! The kids and I got them all pulled and I started the process of sorting and scrubbing. After about 2 hours, and not even a dent made in my mound, I called it quits...for the night! I was determined this morning to get these carrots done, so I stood over the sink a while longer and thought surely someone has an easier method than this. A lot of what I read said, you just get a veggie brush and scrub...I have too many other things to do and at the rate I was going, it would have taken me two days to scrub all my carrots! Then I found it....
 Someone wrote, "Just toss them in the washing machine!" This person is a genius! Why not? Since I was at the point where I just wanted to toss what I hadn't cleaned, this was something worth trying! So in they went! I washed them on a normal cycle, no cleaners of course, with cold water.
 Now those are some clean carrtos! I was very impressed with how clean they got...now I just have to cut, blanch, and freeze them! I read that this process works well with radishes and green beans too!
 Someone wrote, "Just toss them in the washing machine!" This person is a genius! Why not? Since I was at the point where I just wanted to toss what I hadn't cleaned, this was something worth trying! So in they went! I washed them on a normal cycle, no cleaners of course, with cold water.
 Now those are some clean carrtos! I was very impressed with how clean they got...now I just have to cut, blanch, and freeze them! I read that this process works well with radishes and green beans too!
Thursday, January 26, 2012
Faith Comes By Hearing
Today, I finished Genesis and it only took me 3 days! Not only do I have a mental timeline in my brain now (something I've never been able to grasp) but I understood all of the information. Now I'm not one to curl up with a good book...I never have been because I can't sit still long enough. I have this uncontrollable urge to keep moving. But over the last few weeks, I've heard on the radio and read on a few blogs of people doing a read the bible in 90 days challenge. I was thinking to myself, that sounds impossible for me, even if I could read it, how much would I understand? I don't want to read the bible just to say I've read it cover to cover...I want to read it as well as understand it, enjoy it, and be able to retain it! Reading the bible from cover to cover is something I've always wanted to do. I've attempted, but sadly it always resulted in frustration and me quiting. Then I came across this post at Raising Homemakers the other day and suddenly I felt encouraged. Covering the bible in 90 days or even a year didn't seem so impossible anymore!
I set my computer up in the kitchen, pressed play and began to clean! Clean? What does covering the bible in 90 days have to do with cleaning? Well, I can listen to the bible and feed my urge to move by cleaning!

This is just one of the cabinets I was able to clean out and organize while listening to the bible! Hearing the bible is amazing! If you prefer, you can hear it word for word as a drama which brings the words to life.
If you're like me and have a hard time sitting still long enough to read, I encourage you to give listening a try! What's even more exciting, is my little ones enjoy listening too!
Free Audio Bible Download | Faith Comes By Hearing
I set my computer up in the kitchen, pressed play and began to clean! Clean? What does covering the bible in 90 days have to do with cleaning? Well, I can listen to the bible and feed my urge to move by cleaning!

This is just one of the cabinets I was able to clean out and organize while listening to the bible! Hearing the bible is amazing! If you prefer, you can hear it word for word as a drama which brings the words to life.
If you're like me and have a hard time sitting still long enough to read, I encourage you to give listening a try! What's even more exciting, is my little ones enjoy listening too!
Free Audio Bible Download | Faith Comes By Hearing
Thursday, January 19, 2012
Making Soap!
Well, I promised some photo's of making soap!
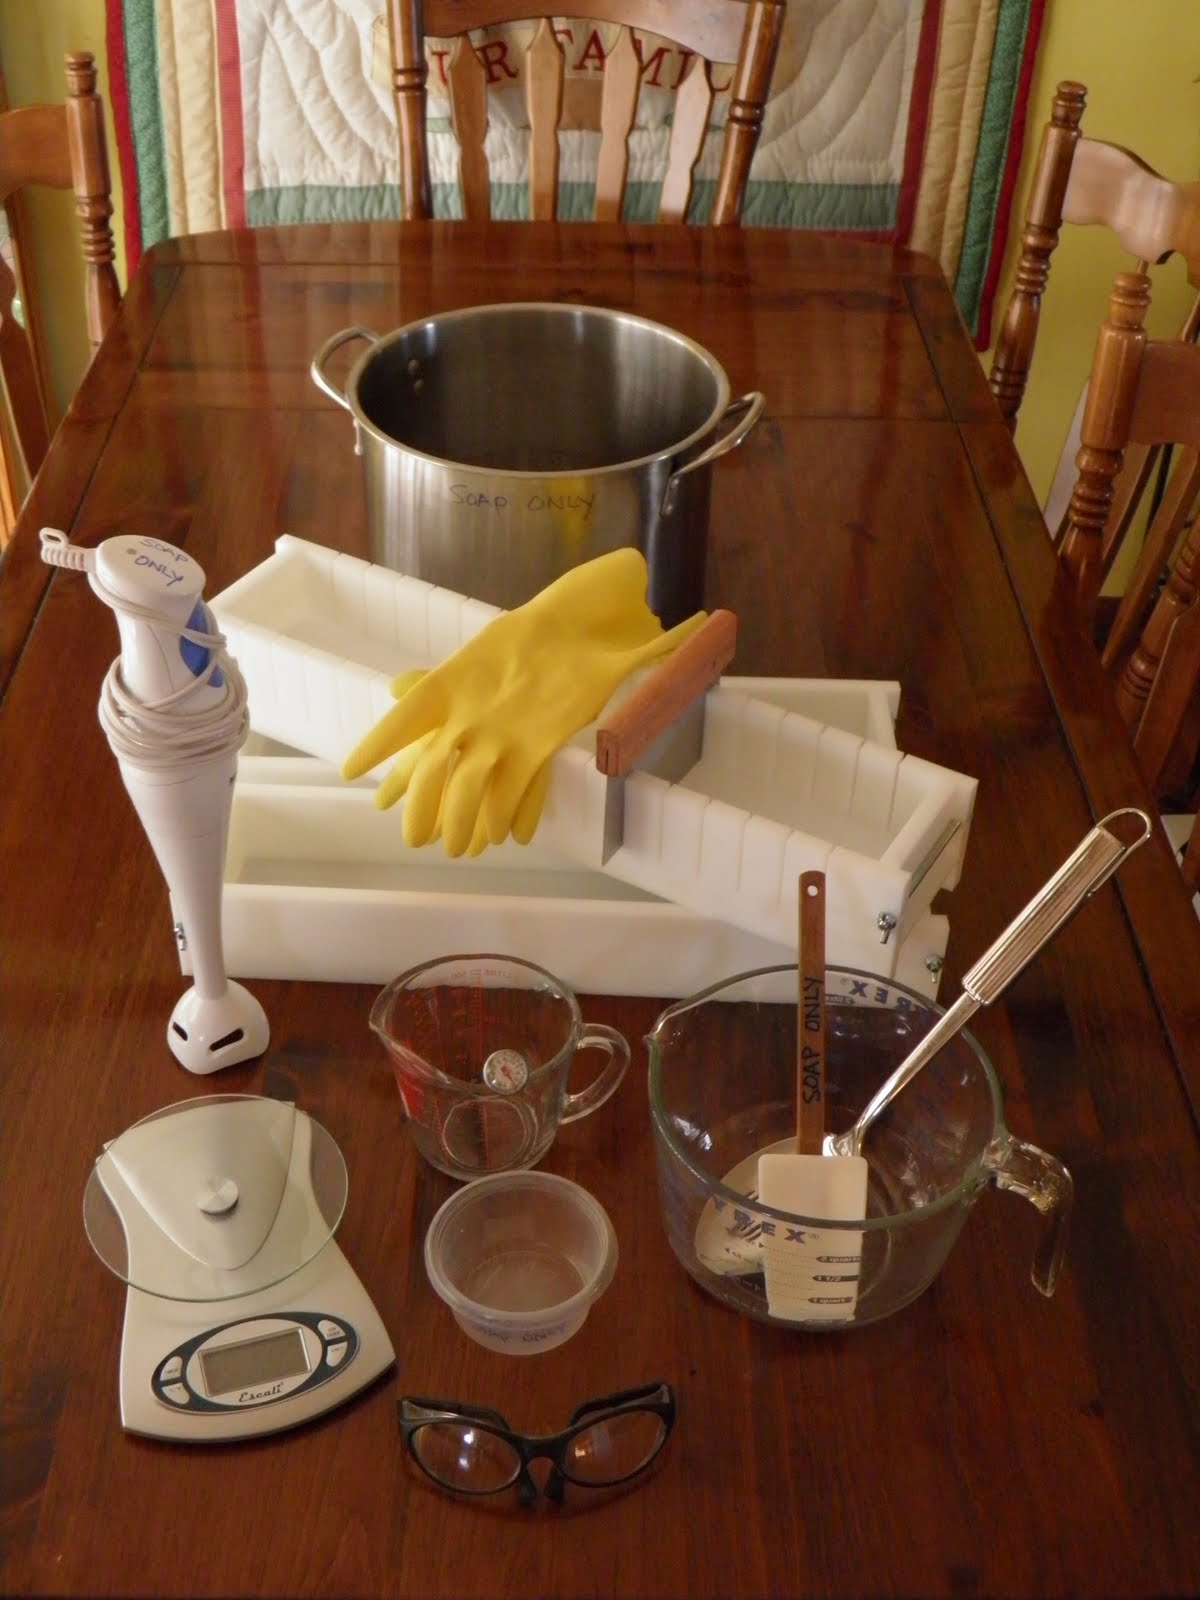
First, you'll want to find a recipe...my first batch as well as the one I'm about to show you came from an e-book that I purchased for $10 from Homemaking on the Homestead. This book was written for beginners and gives step by step photo tutorials on how to make 3 basic bars of soap...even a laundry bar! I was very intimidated when I first considered making my own soap, but I highly recommend this book if you are interested in soap making because it's full of photos and each step is explained very well!
Let's get started...
First, I precisely measured the oils and melted them over medium heat in a stainless steal pot.

Second, I precisely measured my lye and water in separate glass measuring cups.

For this next step, you'll want to move to a well ventilated place or even outside to mix your water and lye. ***VERY IMPORTANT*** Never pour the water into the lye it will result in a dangerous eruption...remember to mix carefully. I recommend skin and eye protection.

Next, I had to let both mixtures cool.

Once the mixtures are at the correct temperature, it's time to combine them. Again, be very careful, because the lye is caustic. If by chance you do get it on your skin, you'll want to rinse the area immediately with white vinegar to neutralize the lye.

The stick blender will speed up the saponification process. It took me about 12 minutes to achieve "trace".

Trace is difficult to explain, but easy to recognize. It's the point when the mixture is ready for fragrance, exfoliants, and pouring. The fragrance oils will sometimes change the color of your mixture depending on what kind you're using.

Completely mix in your fragrance oil and pour into a mold. As you can see, my soap looks a bit like Fels Naptha...which is what I currently use to make my laundry detergent! I can't wait to use these!

Insulate your mold with a towel so it can cool slowly. Allow it to rest for at least 24 hours.

After it has rested, remove from mold and cut it into bars.

Let your bars rest on a shelf for the allotted amount of time.

There you have it...homemade soap! My new most favorite fun thing to do!
First, you'll want to find a recipe...my first batch as well as the one I'm about to show you came from an e-book that I purchased for $10 from Homemaking on the Homestead. This book was written for beginners and gives step by step photo tutorials on how to make 3 basic bars of soap...even a laundry bar! I was very intimidated when I first considered making my own soap, but I highly recommend this book if you are interested in soap making because it's full of photos and each step is explained very well!
Let's get started...
First, I precisely measured the oils and melted them over medium heat in a stainless steal pot.

Second, I precisely measured my lye and water in separate glass measuring cups.

For this next step, you'll want to move to a well ventilated place or even outside to mix your water and lye. ***VERY IMPORTANT*** Never pour the water into the lye it will result in a dangerous eruption...remember to mix carefully. I recommend skin and eye protection.

Next, I had to let both mixtures cool.

Once the mixtures are at the correct temperature, it's time to combine them. Again, be very careful, because the lye is caustic. If by chance you do get it on your skin, you'll want to rinse the area immediately with white vinegar to neutralize the lye.

The stick blender will speed up the saponification process. It took me about 12 minutes to achieve "trace".

Trace is difficult to explain, but easy to recognize. It's the point when the mixture is ready for fragrance, exfoliants, and pouring. The fragrance oils will sometimes change the color of your mixture depending on what kind you're using.

Completely mix in your fragrance oil and pour into a mold. As you can see, my soap looks a bit like Fels Naptha...which is what I currently use to make my laundry detergent! I can't wait to use these!

Insulate your mold with a towel so it can cool slowly. Allow it to rest for at least 24 hours.

After it has rested, remove from mold and cut it into bars.

Let your bars rest on a shelf for the allotted amount of time.

There you have it...homemade soap! My new most favorite fun thing to do!
Friday, December 30, 2011
SOAP!
I've entered the world of soap making! It all started when we picked up some homemade soap and shampoo bars at a couple of craft fairs a while back. We LOVED the results...no more cracked hands and clearer complexions. When we ran out of soap, we noticed a change in our skin immediately...cracking, blemishes, and dryness returned! Could making it be that hard? I've been making laundry soap and dishwasher detergent for about 8 months now...why not make body wash and shampoo too?

I made my pitch to the hubby and he tucked that information away! So, for my birthday and Christmas, I got all the supplies I need to make soap for my family at home!
I could hardly wait to make soap after opening each gift! Next, we went to the grocery and hardware store to pick up the ingredients! In my excitement, I didn't take any photos of the actual process...I will next time! Here's a picture of my candy cane bars curing...they smell heavenly!

I made my pitch to the hubby and he tucked that information away! So, for my birthday and Christmas, I got all the supplies I need to make soap for my family at home!
I could hardly wait to make soap after opening each gift! Next, we went to the grocery and hardware store to pick up the ingredients! In my excitement, I didn't take any photos of the actual process...I will next time! Here's a picture of my candy cane bars curing...they smell heavenly!

Tuesday, December 20, 2011
Wonderful Gifts
Last week I did a series of posts about making Christmas gift baskets filled with homemade goodies! Today I want to share a few gifts from a few of my friends...

We had another Christmas gathering to attend last night...for Boy Scouts. My friend Lisa made these adorable little angel earrings for me! Tucked in with the earrings, was the scripture, Luke 2:10, But the angel said to them, "Do not be afraid, I bring you good news of great joy that will be for all people."

Lisa also made a special gift for the kids! PLAY DOUGH...with cookie cutters! What an awesome idea!

I just had to get these adorable little dolls for Cassie! Aren't they cute? Notice that I couldn't get just one...I thought one would be lonely! These were made by my dear friend Allison!

Here's Rusty all snuggled up with MY corn bag! These are a hot (no pun intended) item around my house! We've worn out the sleeves that hold the inner corn bag, but our corn is still going strong! My friend Chrissy makes these soothing bags that can be heated in the microwave or put in the freezer as a cold pack! I use mine to warm my spot up before climbing in bed! You can check out these and other great items HERE!

We had another Christmas gathering to attend last night...for Boy Scouts. My friend Lisa made these adorable little angel earrings for me! Tucked in with the earrings, was the scripture, Luke 2:10, But the angel said to them, "Do not be afraid, I bring you good news of great joy that will be for all people."

Lisa also made a special gift for the kids! PLAY DOUGH...with cookie cutters! What an awesome idea!

I just had to get these adorable little dolls for Cassie! Aren't they cute? Notice that I couldn't get just one...I thought one would be lonely! These were made by my dear friend Allison!

Here's Rusty all snuggled up with MY corn bag! These are a hot (no pun intended) item around my house! We've worn out the sleeves that hold the inner corn bag, but our corn is still going strong! My friend Chrissy makes these soothing bags that can be heated in the microwave or put in the freezer as a cold pack! I use mine to warm my spot up before climbing in bed! You can check out these and other great items HERE!
Friday, August 12, 2011
Homemade Dishwasher Detergent
Why would I want to make my own dishwasher detergent? Reason one, it saves a lot of $$$! Reason 2, it's easy to make! Reason 3, it cleans far better than the stuff I used to buy!

I use vinegar, borax, and washing soda to make a variety of household cleaners because my eyes would burn, I'd cough from inhaling the fumes, and my skin would itch and crack. So, the other day when I ran out of dish detergent, I thought, I make all my other cleaners, why not try to make dishwasher detergent? The only thing I was missing was citric acid...well, it was a little expensive and I had to order it because it's not something you can run to the store and pick up. So, I searched around to see if there was anything I could substitute it with until I could order some. Lemi Shine! The side of the bottle says you can clean your washer with a tablespoon full, so I did that before I made my detergent. There was a big improvement! Next, I loaded my dishwasher, added 1 Tablespoon of my new detergent, and hit start! I couldn't believe it...my glasses weren't cloudy anymore! Then I loaded every clear glass, vase, and jar in to get a wash! No more cloudy glasses, they all came out clear!
The recipe to make your own dishwasher detergent is...
1 cup washing soda
1/2 cup salt
3/4 cup Lemi Shine or Citric Acid
The vinegar is your rinse aid. Use this instead of Jet Dry...it's cheaper and don't worry, it won't smell!
***UPDATE***
The first batch I made, I stored in a glass jar...it became one big clump that was difficult to use. The next bag I mixed and stored in a Ziploc bag. No more clumping problems!

I use vinegar, borax, and washing soda to make a variety of household cleaners because my eyes would burn, I'd cough from inhaling the fumes, and my skin would itch and crack. So, the other day when I ran out of dish detergent, I thought, I make all my other cleaners, why not try to make dishwasher detergent? The only thing I was missing was citric acid...well, it was a little expensive and I had to order it because it's not something you can run to the store and pick up. So, I searched around to see if there was anything I could substitute it with until I could order some. Lemi Shine! The side of the bottle says you can clean your washer with a tablespoon full, so I did that before I made my detergent. There was a big improvement! Next, I loaded my dishwasher, added 1 Tablespoon of my new detergent, and hit start! I couldn't believe it...my glasses weren't cloudy anymore! Then I loaded every clear glass, vase, and jar in to get a wash! No more cloudy glasses, they all came out clear!
The recipe to make your own dishwasher detergent is...
1 cup washing soda
1/2 cup salt
3/4 cup Lemi Shine or Citric Acid
The vinegar is your rinse aid. Use this instead of Jet Dry...it's cheaper and don't worry, it won't smell!
***UPDATE***
The first batch I made, I stored in a glass jar...it became one big clump that was difficult to use. The next bag I mixed and stored in a Ziploc bag. No more clumping problems!
Sunday, April 17, 2011
Outdoor Seedling Protection
The wind was strong, the sky was eerie, the lights flickered, and the weather radio alerts were constant, but we did weather the storm with no problems...and so did our garden! I thought for sure that we would loose everything we planted yesterday morning, but thanks to my brilliant and very thrifty hubby, all of our little seedlings had adequate protection from the storm. When Dan asked me to save all of our large olive oil and juice bottles last summer, I didn't give it much thought...that is until yesterday! He cut the bottoms off the bottles, threw the caps away, and tossed them in a bag to serve a purpose this year. Once we got the seedlings in the ground, he put the bottle around the young plants to act as a green house and to protect their delicate little stems from the wind and rabbits! So, yesterday morning when I got up I wanted to evaluate things and to my surprise, all of my plants were safe and sound in their bottles.

Here is the garden with everything planted. I know it doesn't look like much now, but in a few weeks it should look nice and healthy and in a few short months, the harvesting will begin! I can't wait!

Here are our recycled bottles being put to good use! Inside these bottles are bush beans!

I know this isn't a picture of my garden, but I still wanted to share it. Your probably wondering what it is. Well, we were driving home from church last night and I was admiring how beautiful the full moon was. My brain then moved on and again I didn't think much more of it...that is until, I walked in the house with my arms full! Since my arms were full, I couldn't flip on the light switch and when I set all my stuff on the table, I glanced out the back door and saw the moon again. I rubbed my eyes and asked if anyone else could see the cross around the moon. It wasn't my eyes because everyone could see it. We figured out that the screen door fragmented the moons halo which caused it to appear like cross. It was an interesting sight! I know my picture of the moon wasn't very good, but my camera did capture what I wanted to share...so shortly after sunset tonight, look at the moon through a screen and you should see the cross with the moon at the center. It's a wonderful reminder of how awesome our Lord is!

Here is the garden with everything planted. I know it doesn't look like much now, but in a few weeks it should look nice and healthy and in a few short months, the harvesting will begin! I can't wait!

Here are our recycled bottles being put to good use! Inside these bottles are bush beans!

I know this isn't a picture of my garden, but I still wanted to share it. Your probably wondering what it is. Well, we were driving home from church last night and I was admiring how beautiful the full moon was. My brain then moved on and again I didn't think much more of it...that is until, I walked in the house with my arms full! Since my arms were full, I couldn't flip on the light switch and when I set all my stuff on the table, I glanced out the back door and saw the moon again. I rubbed my eyes and asked if anyone else could see the cross around the moon. It wasn't my eyes because everyone could see it. We figured out that the screen door fragmented the moons halo which caused it to appear like cross. It was an interesting sight! I know my picture of the moon wasn't very good, but my camera did capture what I wanted to share...so shortly after sunset tonight, look at the moon through a screen and you should see the cross with the moon at the center. It's a wonderful reminder of how awesome our Lord is!
Monday, September 13, 2010
Kids Apron's


A few weeks ago, the kids, some friends and I went to the Museum of the Albemarle. For a free outing, I'd say it's a 10! They have a great kids area where they can play dress up, create a decoy, play puppets, and much more. While they were playing dress up, Cassie tried on an apron which gave me the idea to make the kids their own apron's...hopefully, this will help save on stain treating some of their shirts. If not, at least they'll look cute!
Tuesday, July 27, 2010
Help Around The House


My oldest son has had a chore chart in place for a few years now. When I made it, I not only added chores, but I added almost all of his daily responsibilities. As he gets older, I change it up a bit! This is a great way for him to hold himself accountable...and it's a good way to remind him of his daily/weekly responsibilities before mom and dad start nagging! Since the chore chart has worked so wonderfully with my oldest, I thought I would give it a try with my 6 year old and 3 year old. I found these printable chore charts here! The wonderful thing about these, is you can customize them to fit your child's abilities and personality. There is only space for 3 chores. However, if you think your child could handle more, you could make a list for each room in the house or even make a morning and afternoon chart.
Now, I'll move on to how I made it! For the little ones chart, I customized, printed it and colored it in. Then I mounted it to some retired card stock (wonderful way to use up that retired stuff) and laminated it! Then I punched some eyelets in the top so it can hang on the refrigerator...oh, the ribbon is retired too! The reason I laminated it, is so the kids can use a dry erase marker to put a check in each completed chore box and at the end of the week, they get a little treat! Come Monday, they can erase and start all over!
Sunday, July 25, 2010
Behavior Scale
.JPG)

I have a behavior scale that I use to keep the kids behavior in check. Since we are preparing to start a new school year, I thought I would make some renovations of my own in our school room and around the house. The renovations were new, but the color's I used were not...I thought I would put some of my retired card stock to good use! I used Summer Sun, Green Galore, and Real Red. After choosing my colors, I pressed 3 top notes in each color to make my pockets and then used some impression folders to give them some texture. Along with using up some retired paper, I thought I would use up some retired ribbon as well...Certainly Celery, So Saffron and Riding Hood Red. To hang the scale on the fridge, I added some eyelets and hung it from some magnets on the fridge for the kids to keep a close eye on! I decorated the tops of a couple of pencils to move up and down the scale.
The kids start every day in the first green pocket. When their behavior is bad I move their pencil towards the red and they can do good deeds to move back towards green. However, if they make it to the last red pocket, they have to go to their bed for at least 30 minutes.
Subscribe to:
Posts (Atom)