Friday, February 3, 2012

Danny's T-shirt Quilt...Finally!

Last summer I put a memory quilt together for Cameron. Well, we had a little problem...dad wanted one too! Danny began to think I was never going to get around to finishing his because a different project would jump to the head of the line. My poor hubby has watched me pull this project out and put it away a couple dozen times over the last 6 years. He'd had enough...he took Cameron's quilt ransom and refused to give it up until his was finished. He would snuggle in it and say to Cam...tell mom to finish mine so you can have yours.
We've just been so busy...I thought I could finish it for our anniversary, but that came and went. Then Danny asked, can I have it for Christmas? That came and went too! How about my birthday? Still couldn't get it finished! Danny left for California almost 5 weeks ago for training at the Chief's Academy...well, I've had to keep myself busy and guess what was first on my priority list? How about for graduation, dear?

Once I got the shirts from his childhood, high school years, years in the service, t-ball and soccer coaching, scouts, ski trips, family reunion, and a couple special pieces of the kids clothes all put together for the top, my neighbor and friend offered to let me use her long arm Gammill to quilt it! WOW...can I just say that is an intimidating machine! It only took me a moment to remember how how frustrating it was to quilt Cam's on my little machine...intimidating was worth it!


I have to share this, it took me a week to quilt Cam's and 7 hours to quilt Danny's! Most of that time was me getting comfortable with the new equipment! Danny's quilt is about 18 in. longer and wider than Cam's...there's no way I would have been able to finish it on my machine!


I'm glad it's finished and I can't wait to give it to him! No more t-shirt quilts for a while. Although, Colin did ask me, "Ma, when I get Cam's age will you make me a quilt with my shirts!" How can you not say yes to such a sweet request?! Thankfully I have some time!

I've linked this post to Homestead Revival's Barn Hop and Teaching Good Thing :Fiber Arts Monday

Wednesday, February 1, 2012

Coverall Dresses

About two weeks ago I stumbled upon the cutest coverall dress. In the link you will see how to make this darling little dress made from an old pair of coverall's. I love coverall's and remembered that I put two pair that Cassie had outgrown in length in the attic. You guessed it, I ventured into the attic for those coverall's! It really was easy...pick out some fabric, cut off the legs and attach the skirt! VIOLA...the overalls are back in business!


Thursday, January 26, 2012

Faith Comes By Hearing

Today, I finished Genesis and it only took me 3 days! Not only do I have a mental timeline in my brain now (something I've never been able to grasp) but I understood all of the information. Now I'm not one to curl up with a good book...I never have been because I can't sit still long enough. I have this uncontrollable urge to keep moving. But over the last few weeks, I've heard on the radio and read on a few blogs of people doing a read the bible in 90 days challenge. I was thinking to myself, that sounds impossible for me, even if I could read it, how much would I understand? I don't want to read the bible just to say I've read it cover to cover...I want to read it as well as understand it, enjoy it, and be able to retain it! Reading the bible from cover to cover is something I've always wanted to do. I've attempted, but sadly it always resulted in frustration and me quiting. Then I came across this post at Raising Homemakers the other day and suddenly I felt encouraged. Covering the bible in 90 days or even a year didn't seem so impossible anymore!

I set my computer up in the kitchen, pressed play and began to clean! Clean? What does covering the bible in 90 days have to do with cleaning? Well, I can listen to the bible and feed my urge to move by cleaning!

This is just one of the cabinets I was able to clean out and organize while listening to the bible! Hearing the bible is amazing! If you prefer, you can hear it word for word as a drama which brings the words to life.

If you're like me and have a hard time sitting still long enough to read, I encourage you to give listening a try! What's even more exciting, is my little ones enjoy listening too!
Free Audio Bible Download | Faith Comes By Hearing

Thursday, January 19, 2012

Making Soap!

Well, I promised some photo's of making soap!
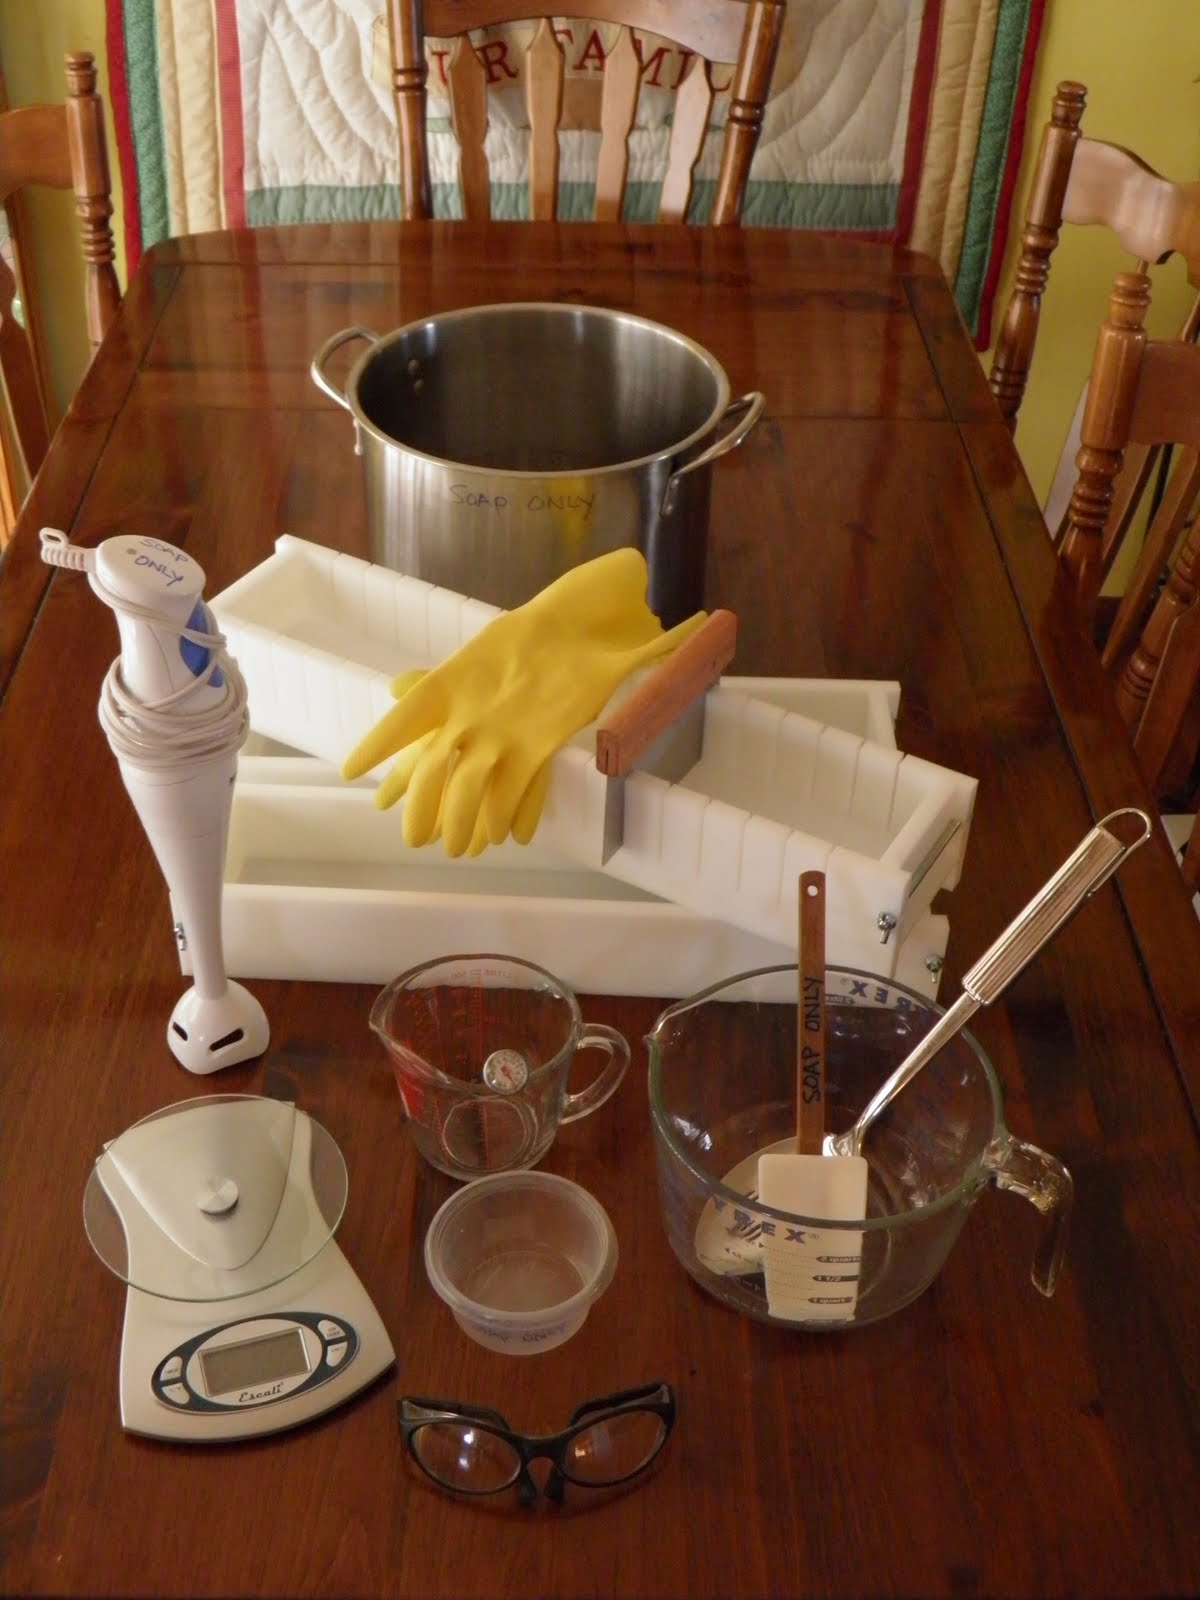
First, you'll want to find a recipe...my first batch as well as the one I'm about to show you came from an e-book that I purchased for $10 from Homemaking on the Homestead. This book was written for beginners and gives step by step photo tutorials on how to make 3 basic bars of soap...even a laundry bar! I was very intimidated when I first considered making my own soap, but I highly recommend this book if you are interested in soap making because it's full of photos and each step is explained very well!

Let's get started...
First, I precisely measured the oils and melted them over medium heat in a stainless steal pot.


Second, I precisely measured my lye and water in separate glass measuring cups.


For this next step, you'll want to move to a well ventilated place or even outside to mix your water and lye. ***VERY IMPORTANT*** Never pour the water into the lye it will result in a dangerous eruption...remember to mix carefully. I recommend skin and eye protection.


Next, I had to let both mixtures cool.


Once the mixtures are at the correct temperature, it's time to combine them. Again, be very careful, because the lye is caustic. If by chance you do get it on your skin, you'll want to rinse the area immediately with white vinegar to neutralize the lye.


The stick blender will speed up the saponification process. It took me about 12 minutes to achieve "trace".


Trace is difficult to explain, but easy to recognize. It's the point when the mixture is ready for fragrance, exfoliants, and pouring. The fragrance oils will sometimes change the color of your mixture depending on what kind you're using.


Completely mix in your fragrance oil and pour into a mold. As you can see, my soap looks a bit like Fels Naptha...which is what I currently use to make my laundry detergent! I can't wait to use these!


Insulate your mold with a towel so it can cool slowly. Allow it to rest for at least 24 hours.


After it has rested, remove from mold and cut it into bars.


Let your bars rest on a shelf for the allotted amount of time.


There you have it...homemade soap! My new most favorite fun thing to do!

Saturday, January 14, 2012

Butter

Yesterday, I came across a recipe for 9 grain bread! It was by far the best bread I've ever tasted and so very easy to make. However, you'll have to come back another day for the bread...today's post is about butter, because you can't have warm bread without butter!

Pour 2 cups of heavy cream into your mixer and a couple pinches of salt (optional). Set on med-high speed.


About 5 or so minutes into mixing, you'll hit the whipped cream stage...just add a tablespoon or 2 of powdered sugar and a splash of vanilla. Not today though, we have to keep mixing because that bread is about ready to come out of the oven!


Almost there! You can see that it's starting to change color and separate a little. Keep mixing!


You'll know when it's finished when all the butter collects on the whip and buttermilk is left in the bowl.


Pull your butter off the whip and run it under very cold water. You'll want to work the butter and squeeze as much buttermilk out of it as you can.


You can put it in a dish, roll it in a ball, or make it any shape you'd like. I personally use an old mold that was given to me by a very sweet and generous lady I go to church with. I hunted for a mold for months and you'd be shocked how much they sell for!


Don't throw that buttermilk out! Save it for some pancakes or salad dressing!


Here's my butter with that OH SOOOO YUMMY 9 grain bread! There aren't words!

Friday, January 13, 2012

Finished Block


Here is my finished 12x12 quilt block for January. It was interesting working with the smaller pieces...something I'm not used to. I can't wait to see what next months block will look like!

Thursday, January 12, 2012

Block of the Month Club

Does your local quilt shop have a block of the month club? Ours does and for $5 you can have a quilt top in December! It's been 10 years since I participated in a block of the month club. It's an easy way to feed that need to sew and not get overwhelmed with picking out fabric and finding the time to actually do the project! For example, right now I am working on a T-shirt quilt for my hubby that has been moved to the back burner 100+ times over the last 6 years! I'm determined to complete it so I can give it to him when he returns home from the Chief's Academy!


Because it's only $5, there are rules. You must complete your block by the second Saturday of the following month to take in and show to receive the new pattern and material at no charge. If you can't make it, our quilt shop is generous enough to give you 1 free pass but any missed after that will require another $5 fee. It's almost like you have to earn your next pattern! A quilt for $5 is well worth completing 1 block to turn in each month!

Wednesday, January 11, 2012

SmOOOOOthie-sicle!

In an effort to get more fruits into my pickiest eater, I have resorted to Popsicles! I don't know if it's a texture issue or a visual dislike, but I am on a mission to get more fruits and veggies in her! Cassie has a much stronger will than her brothers do, especially when it comes to food. Maybe it's because she's the baby or maybe because she's a girl; I don't know, but I'm at my breaking point when it comes to the battle over food.

For the last two days, I've made smoothies with breakfast. Colin and I can't get enough, but little Miss Cassie can pick out even the smallest strawberry seed! I guess I'll have to invest in a blender that pulverises seeds at some point.


Ingredients:
1 banana
1 kiwi
4 peach halves
1/2 cup thawed strawberries
1/4 cup pineapple
6 oz. vanilla yogurt
1/8 cup coconut milk
2 TBSP honey


I'm really hoping this Popsicle disguise will help! We'll see and I'll let you know how it turns out. If you have any fruit and vegetable tricks that you'd like to share, I'd love to hear about it...and give it a try!

Friday, December 30, 2011

SOAP!

I've entered the world of soap making! It all started when we picked up some homemade soap and shampoo bars at a couple of craft fairs a while back. We LOVED the results...no more cracked hands and clearer complexions. When we ran out of soap, we noticed a change in our skin immediately...cracking, blemishes, and dryness returned! Could making it be that hard? I've been making laundry soap and dishwasher detergent for about 8 months now...why not make body wash and shampoo too?


I made my pitch to the hubby and he tucked that information away! So, for my birthday and Christmas, I got all the supplies I need to make soap for my family at home!

I could hardly wait to make soap after opening each gift! Next, we went to the grocery and hardware store to pick up the ingredients! In my excitement, I didn't take any photos of the actual process...I will next time! Here's a picture of my candy cane bars curing...they smell heavenly!

Tuesday, December 20, 2011

Wonderful Gifts

Last week I did a series of posts about making Christmas gift baskets filled with homemade goodies! Today I want to share a few gifts from a few of my friends...


We had another Christmas gathering to attend last night...for Boy Scouts. My friend Lisa made these adorable little angel earrings for me! Tucked in with the earrings, was the scripture, Luke 2:10, But the angel said to them, "Do not be afraid, I bring you good news of great joy that will be for all people."


Lisa also made a special gift for the kids! PLAY DOUGH...with cookie cutters! What an awesome idea!


I just had to get these adorable little dolls for Cassie! Aren't they cute? Notice that I couldn't get just one...I thought one would be lonely! These were made by my dear friend Allison!


Here's Rusty all snuggled up with MY corn bag! These are a hot (no pun intended) item around my house! We've worn out the sleeves that hold the inner corn bag, but our corn is still going strong! My friend Chrissy makes these soothing bags that can be heated in the microwave or put in the freezer as a cold pack! I use mine to warm my spot up before climbing in bed! You can check out these and other great items HERE!

Saturday, December 17, 2011

And the winner is...

This morning, we wrote the names of the 3 ladies that entered my card giveaway on little slips of papar and did a drawing! Colin picked the lucky lady...


Congratulations, Tiffany! Thank you ladies for visiting my blog and we wish you a very Merry Christmas and a blessed 2012!

Thursday, December 15, 2011

Christmas Decorating

I've enjoyed seeing all the different ways people decorate for Christmas. We've seen some spectacular light displays on homes in our community. What I've enjoyed most is seeing all of the beautiful handmade decorations at my fellow bloggers blog's...


Isn't this beautiful? I just love this idea! You can check this and many other ideas out at Teaching Good Things

For the last couple of years we've gotten our tree at friend's big red barn! When we got it home and Danny was getting it set up, he says, "Who's idea was it to bring a tree in the house?" Me being who I am said, "Well, I guess it was mine." In his frustration, lets just say that wasn't the answer he was looking for. Trying to keep from laughing, I had to ask, "What's wrong?" He didn't respond, just a grumble, that is until he started stringing the brand new lights that only 2/3 of worked. Again, he asks in his frustrated voice, "Who's idea was it to bring a tree in the house...and put lights on it?" Knowing he wasn't looking for the first answer I gave him, I had to giggle and respond, "Me, dear." So, we managed to gather some working lights together and got our tree decorated.


The kids are constantly rearranging the ornaments and moving them from tree to tree. Yes, we have more than one tree! The kids look forward to getting an ornament from their Me-Me and Pa-Paw every year. Throw in all the ornaments they make each year, that equals a lot of ornaments! To remedy this, we got the kids their own little tree to hang all of their personal ornaments on. This is a picture of Colin's tree...he LOVES his nut crackers! This year he asked me to make him a yo-yo garland like the one I purchased for Cassie's tree at a craft fair last year. The yo-yo garland is probably my favorite decoration because I used scraps from quilts I've made over the years, so each scrap has a memory.


One more thing I wanted to share was how I display our Christmas cards. There were some neat idea's at the Barn Hop this week!

Wednesday, December 14, 2011

Homemade Gift Ideas Part 4 & Giveaway!

Another great idea for your Christmas gift basket is cookies! Baking cookies is a Christmas tradition in most homes. Some of my favorites are...


Chocolate Mint Chip Cookies...these are a favorite around here! They taste like a Girl Scout Thin Mint to me! Some how I don't feel as guilty when I eat 10 of mine! Here's how to make them!

Ingredients:
2 cups sugar
1 1/4 cup softened butter
2 eggs
3/4 cup cocoa powder
2 1/2 cups whole wheat flour (I use a 50/50 mix of fresh milled hard and soft wheat to give me an all purpose flour)
2 tsp salt
1 tsp baking soda
1 cup chopped Andes mints

Directions:
1. Cream first 3 ingredients.
2. Mix remaining ingredients in a separate bowl then add to wet ingredients and mix well.
3. Spoon on to a greased (I use parchment paper) cookie sheet. Bake 7-12 minutes at 350*, until cookies are just done, but not well-done. Over cooking will make them dry and hard. Cookies will flatten as they cool. Leave on pan for a few minutes before moving them to a cooling rack.


Another one of my favorites is Fruit Cake Cookies. I don't know about you, but I think fruit cake gets a bad wrap. All the terrible stories I'd heard about fruit cake kept me from ever trying it...that is until I tasted my mother-n-law's fruit cake cookies! The first time I tried them, my thought was I'd give it a try since it was bite sized and easy to throw out if I didn't like it! Now, I make them every year and they are a hit everywhere I take them.

Ingredients:
1 cup softened butter
1 cup light brown sugar
3 cups sifted flour (I don't sift because my flour is fresh milled. I use 3 1/2 cups of a 50/50 mixture of soft and hard wheat to give me an all purpose flour)
1/2 tsp baking soda
1 tsp cinnamon
3 eggs well beaten
1/4 cup sherry wine
1/4 evaporated milk
1 lb. of each, white raisins and dates
8 oz. of each, chopped green and red candied cherries
16 oz. chopped candied pineapple
5 cups of nuts (I use a mixture of walnuts and pecans)

Directions:
1. Cream butter and sugar.
2. Stir in eggs.
3. Mix dry ingredients in a separate bowl and add to cream mixture.
4. In a cup, mix sherry and milk and add alternately with fruit and nut mixture.
5. Drop cookies in balls on a parchment paper lined pan and bake at 300* for 20 minutes.


This next one is a new favorite around our house! I made this recipe for the first time the other day with the help of my niece Hannah...Thank you, Hannah! I always called these Snowballs when I was growing up, but they are also know as Pecan Sandies. Again, I went to my mother-n-law who has an indefinite stash of recipes and this one is an old recipe she clipped out of the paper many years ago!

Ingredients:
2 cups sifted all-purpose flour (Again, I used the 50/50 soft and hard wheat mixture, but add an extra 1/2 cup to any recipe you are converting)
1/2 tsp salt
3/4 cup softened butter
1/2 cup sugar
1 egg
1 tsp vanilla extract
1 cup chopped pecans
Confectioners' sugar to roll warm balls in after baking.

Directions:
1. Cream butter; add sugar and continue; add egg and vanilla and continue mixing.
2. Mix dry ingredients and gradually add to wet mixture.
3. Add pecans and mix.
4. Shape dough into balls and bake at 350* for 12-15 minutes or lightly browned.
5. Roll in confectioners' sugar while still warm and then again when cool.


Since Christmas is the season of giving, I thought this would be the perfect time to do my first giveaway! Did you see the cards I posted yesterday? Well, I'm giving those 5 plus 7 more away...that equals 12 cards for Christmas! Below is a photo of the additional 7 you'll receive! All you have to do is leave a comment on this post (please make sure your email or blog link is in the post so I can contact the winner). Giveaway will close this Friday, December 16th at midnight! Check back on Saturday to find out who the winner is! Merry Christmas and Thank you for visiting my blog!


This post is linked to the Raising Homemaker's Wednesday Homemaking Link-up!

Tuesday, December 13, 2011

Homemade Gift Ideas Part 3

Every Christmas we put together baskets full of homemade goodies to give away. Here is another goodie idea that you can add...homemade cards!